¶ Always Free Oracle Cloud Hosting Guide for Foundry
¶ A. Overview
¶ Objective
This guide provides steps for a relatively simple installation of Foundry plus a reverse proxy using Caddy at the end of which you will have a functional cloud-hosted Foundry installation using Oracle Cloud with optional backups and S3 integration at no cost with no time limit.
-
You will end up with:
- A VM with 1 cpu core (optionally increased to 2 cores) and 4GB of RAM (optionally increased to 12GB).
- Foundry running 24/7, including after restarts.
- A domain name and an automatically managed encrypted connection to your Foundry instance.
- Roughly 40GB (optionally increased to roughly 190GB) available storage in the User Data folder.
- Outbound data transfer of 10TB per month, more than enough for hosting Foundry even with daily, extremely media-rich sessions.
- A backup policy that automatically keeps backups in case of emergencies.
¶ Important Information and Requirements
This guide assumes that you are not an existing customer with Oracle Cloud and that the services set up fall within the Oracle Always Free Tier resulting in no monthly charges. Potential pitfalls or notes to be aware of when using the Always Free Tier will be highlighted wherever appropriate.
This guide also assumes that you are able to navigate the Oracle interface without additional assistance beyond general instructions, and that you are technical enough to understand the requirements below without additional assistance.
The following is required to complete this guide:
- Understanding of using a terminal that includes the ssh utility, such as:
a. Powershell in Windows.
b. Terminal in Linux and MacOS. - Notepad or other text editor.
- Valid domain name (for secure connection with HTTPS only), such as:
a. A purchased domain name.
b. A free subdomain from a service like Duck DNS. - A valid credit or debit card is required to sign up for the Always Free Tier services on Oracle Cloud. Authorization charges may appear temporarily.
The Oracle Free Tier is available on a limited first-come, first-serve basis. It isn't possible to predict if an instance will be available in your region until you attempt to create it. If no instances are available, one may become available at a later time - within hours, days, weeks, or potentially months.
¶ Getting Help
If you get stuck on a particular step, please first ensure that all commands in black text quotes entered exactly as they appear.
Troubleshooting assistance for this guide can be found on the official Foundry Discord. Copy the link from the specific step number (ie: C31) you are having difficulty with and then post in the #install-and-connection channel on the Foundry Discord.
Was your A1 instance disabled or reclaimed?
Have you received an error message stating "instance is disabled and will not accept any actions or requests?"
See the archived information onward for an explanation and the Restore Disabled A1 Instance section for instructions on how to restore your Foundry instance.
¶ Disclaimer
While this guide is written to target the Always Free Tier and should not result in any charges if followed correctly, you are fully responsible for ensuring that no costs will be incurred. It is recommended to conduct a Cost Analysis and set a budget after this guide is complete to ensure that all services are Always Free.
All information in this guide is accurate as of the date it was written.
Oracle at its sole discretion may remove access to free tier accounts at any point without warning.
As of June 14, 2026 Oracle has changed the limits of the Always Free Tier to 2 CPU cores and 12GB of RAM (the 200GB volume space remains unchanged). Users who have previously created instances above these new free limits may see charges.
If you followed this guide exactly before this date you would remain within the new free tier.
¶ B. Account Setup
¶ Objective
At the end of this section, you will have a registered account with Oracle Cloud that has access to the Always Free Tier services.
¶ Account Creation and Upgrade
A valid credit or debit card is required to sign up for an account with Oracle Cloud in order to access the Always Free Tier services.
B1. Review the availability of Always Free services in your preferred region. At minimum, this guide targets the Compute VM, Block Storage, and optionally the Object Storage services. Ensure that they are available in the region you want to use.
B2. Sign up for an account at Oracle Cloud, entering your personal information as well as credit or debit card information when prompted. Ensure that you select the proper region to set as your Home Region. Once this is selected, it cannot be changed.
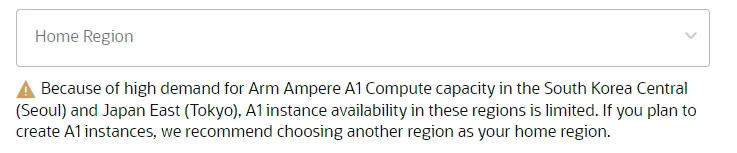
READ THIS WARNING: When choosing your home region, pay very special attention to any messages about Arm Ampere A1 Compute capacity. See example below. Do not choose regions listed in the warning message as you will not be able to continue with this guide until the A1 instances become available, which may take several days. Choose the next closest geographical region to you and your players and continue.
(Image for example only, check your warning very closely for the regions listed)
B3. Once your account is confirmed, a “Get Started” email will be sent to the registered email address providing access to the Oracle Cloud account. You are now ready to continue this guide!
Will Oracle reclaim my Always Free instance for being idle? ▼
In January, 2023 Oracle sent the following message regarding idle A1 (Always Free) instances:Oracle Cloud Infrastructure Customer,
Oracle Cloud Infrastructure (OCI) will be reclaiming idle Always Free compute resources from Always Free customers. Reclaiming idle resources allows OCI to efficiently provide services to Always Free customers. Your account has been identified as having one or more compute instances that have been idle for the past 7 days. These idle instances will be stopped one week from today, January 30, 2023. If your idle Always Free compute instance is stopped, you can restart it as long as the associated compute shape is available in your region. You can keep idle compute instances from being stopped by converting your account to Pay As You Go (PAYG). With PAYG, you will not be charged as long as your usage for all OCI resources remains within the Always Free limits.
The definition of "idle" is found here: Always Free Tier Resources - Idle Instances
Oracle support has confirmed on January 31, 2023 that all the idle conditions above need to be met for the instance to be considered idle. With a 4GB RAM instance, Foundry will use more than 10% at all times. Thus, following this guide after January 31, 2023 should keep the instance safe from being reclaimed.
If you would like to be absolutely sure, you can upgrade your account to Pay As You Go in the Billing & Cost Management -> Upgrade and Manage Payment section. There is no charge to do so, however a temporary authorization must be placed on a credit card.
Don't I need to upgrade my account to Pay As You Go or my instance will be disabled? ▼
As of January 2022 (possibly earlier), Oracle changed their policy for A1 always free instances. They will no longer be disabled at the expiry of your free trial credits and any A1 instances set up as directed in this guide will not be disabled by Oracle at that time.
See the updated FAQ under the What happens when my Free Trial expires or my credits are used up? heading:
When you've reached the end of your 30-day trial or used all your Free Trial credits (whichever comes first), you’ll be notified and will have a grace period of 30 days, starting from the expiration date, to upgrade to paid.
...
Resources identified as Always Free will not be reclaimed. After your Free Trial expires, you'll continue to be able to use and manage your existing Always Free resources, and can create new Always Free resources according to tenancy limits.
(Emphasis added)
(Text quoted 2022-01-20)
A Pay As You Go account is no longer needed to prevent A1 always free instances from being disabled after the initial 30-days.
Some users in certain regions may require manual account verification which could take a few days of extra time.
If the services described in the next section are not listed, you may need to wait a few more minutes for the account to be fully provisioned. A status notification appears at the top of the page when logged in to Oracle Cloud if the account has not yet been fully provisioned.
¶ C. Compute and Networking Setup
¶ Objective
At the end of this section, you will have set up a Compute VM (Virtual Machine) with Ubuntu 22.04 as well as a VCN (Virtual Cloud Network) required to host Foundry.
Section C has been significantly simplified and generalized due to frequent changes to the Oracle console. As this guide is intended for more advanced users, it leaves the exact navigation instructions open for those users to find the correct sections themselves.
Occasionally, Oracle may ask you to select or re-select a Compartment. If you see a message about a missing Compartment, select the Account Name (root) compartment from the left hand menu, under List scope -> Compartment.
¶ Create a VCN (Virtual Cloud Network) and Security Policy
C1. From the Get Started page, navigate to Networking, -> Virtual cloud networks (VCN).
C2. Use the VCN Wizard to create a new VCN with the following properties:
VCN Name: foundry
IPv4 CIDR Blocks: 10.0.0.0/24
Use DNS hostnames in this VCN: 
unchecked.
You must use the VCN Wizard to create the VCN or your instance may not have the correct gateway/routing/security rules set up.
C3. In the Public Subnet for the VCN created, modify the default security list to include the following Ingress Rules:
Stateless: 
checked
Source CIDR: 0.0.0.0/0
Desination Ports and Protocols: 80 TCP, 443 TCP/UDP, 30000 TCP
Ports 80 and 443 are required for HTTP and HTTPS, and 30000 is required for Foundry. Once a reverse proxy is set up you may optionally remove that port as it will no longer be needed. Adding port 443 UDP here enables HTTP/3 connectivity in Caddy.
¶ Create a Compute VM (Virtual Machine)
C4. From the Get Started page, navigate to Compute -> Instances.
Occasionally, Oracle may ask you to select or re-select a Compartment. If you see a message about a missing Compartment, select the Account Name (root) compartment from the left hand menu, under List scope -> Compartment.
C5. Create a compute instance with the following properties:
Name: foundry
Availability Domain: default (optionally any other AD that is marked always-free)
Image: Ubuntu 24.04 aarch64
Shape: VM.Standard.A1.Flex
RAM: 4GB
Cores: 1
VCN: foundry (created above)
Subnet: public-subnet-foundry
Boot Volume Size: Up to 200GB (ensure you do not allocate more than 200GB between all volumes you may create)
If you have upgraded your account to Pay As You Go to avoid instance reclaiming you may optionally choose more than 4GB of RAM or 1 CPU core.
C6. Before completing the creation of your compute instance, be sure to Save Private Key. Save this key file in an easily accessible and memorable folder. Rename this key to foundry.key.
Due to security restrictions, in Windows it is recommended to save the foundry.key file in the Documents folder or similar user-specific folder.
In Linux or MacOS, you may need to
chmod 600the keyfile if ssh reports an error due to the keyfile being too open.
You must download this key and keep it safe. This key is required to connect to your instance, and it will not be shown again.
How many CPU cores and how much RAM should I use? ▼
As of June 14, 2026 Oracle offers reduced but still significant and flexible resources for their Always Free Tier instances. You can now have up to 2 Ampere cores and 12GB of RAM spread over up to 4 instances, for free. This guide recommends the selection of 1 core and 4GB of RAM as that is more than enough to run Foundry.
An additional core may help increase performance of Foundry slightly and a few more gigs of RAM could help in the most extreme cases for resource-intensive modules. You can flexibly edit the shape after creation if you want to adjust the resources after creation.
In the vast majority of cases, 1 core and 4GB is recommended for Foundry.
If you choose more resources, you may run the risk of having your instance reclaimed due to being idle. For more details, see Always Free Tier Documentation.
What if I can't choose the VM.Standard.A1.Flex shape? ▼
If this shape is not available to select, your account may still be provisioning. Wait until the provisioning banner at the top of the page disappears and try again. This may take a few hours in some cases. If your account is provisioned but you do not see the VM.Standard.A1.Flex shape, then you will have to contact Oracle Support to resolve the issue. Choosing other shapes may incur charges.
You may try switching to another Availability Domain (checking to ensure it is tagged always-free) to see if there are A1 instances in other Availability Domains within your home region. The number of Availability Domains differs in each reagion, with some regions only having 1.
If no Availability Domains in your home region have A1 shapes available, you will have to check back periodically for new availability. This may happen at any time as others free up resources or Oracle adds more A1 resources to the region. It may take a few days, keep checking back regularly.
C7. All other options should be left at default. Click Create.
If you receive an
Out of capacity for shape VM.Standard.A1.Flex in availability domainerror, then there are no more Always Free Tier instances available at the moment. You can try selecting a different Availability Domain above (double check that it is always-free tagged). Otherwise, according to the FAQ, more should become available within a few days. Check back regularly to see when they become available.
C8. Once the large yellow square changes from Provisioning to Running, the instance is ready to be used.
C9. Copy the Public IP Address and save it somewhere for future reference. This IP address is needed to connect to your VM.
This page contains a lot of very useful information about your Computer VM, and is a central place where adjustments can be made later on if needed.
¶ D. Server Setup and Installation
¶ Objective
At the end of this section you will have a functional installation of Foundry using HTTPS and Caddy as a reverse proxy. Foundry will be set to restart any time the Compute VM is restarted, managed by pm2.
¶ Connect to Compute VM Instance and Update
In this section, terminal is used to refer to whichever command line interface you may be using, either Windows Powershell or Linux/MacOS terminal. On Windows cmd will not work, it must be Powershell.
In many terminals, you can paste text with right-click or shift+insert.
D1. In your terminal, navigate to the folder where you saved foundry.key.
In Windows, you can navigate to the folder in File Explorer. Then, hold the shift key and right click within the folder and choose Open Powershell window here.
D2. Run the ssh command where <public ip address> is the Public IP Address (do not include the <> brackets) of your Compute VM as noted in step C9 above.
ssh -i foundry.key ubuntu@<public ip address>
If you receive a
connection refusederror, the instance is probably still starting up and needs another minute or two before it can accept connections. Wait two minutes and try again.If you receive an error about the keyfile being too open, see the info at step C6.
D3. You will likely be prompted to accept the ECDSA key. Type yes and hit enter to accept and continue.
D4. You should see a prompt showing ubuntu@foundry:~$.
All commands going forward are to be entered when you see the ubuntu@foundry:~$ prompt only. If you do not see the prompt then make sure the previous step is not still running. Some commands may take a minute or two to process.
D5. We need to use iptables to open the ports within Ubuntu to allow network traffic on the needed ports. We can do that by:
sudo iptables -I INPUT 5 -m state --state NEW -p tcp --match multiport --dports 80,443,30000 -j ACCEPT
sudo iptables -I INPUT 5 -m state --state NEW -p udp --dport 443 -j ACCEPT
sudo netfilter-persistent save
All further commands should continue to be entered into this terminal in the order written. Do not close the terminal until the end of the guide.
D6. Complete all the steps from the System Setup section in the Linux Installation Guide, stopping at the end of Section C.
¶ Final Words and Ongoing Maintenance
D7. Restart the instance in order to apply any potentialy pending updates that require a restart and to test pm2's ability to restart Foundry correctly.
sudo shutdown -r now
Give the instance a few minutes to restart. You should be able to connect to Foundry without issue once it is fully restarted. You should also be able to
sshinto instance as in D2. If Foundry has not started up after a good 10 minutes, please check yourpm2startup command.
D8. It is good practice to keep your new instance up to date with security patches. To do so, log in to the instance periodically with ssh as in D2 and run the following command:
sudo apt update && sudo apt upgrade -y
D9.Then, restart the instance as in D8.
This concludes the portion of the guide that sets Foundry up and running. You may now continue using Foundry this way without issue going forward. However, if you want to set up backups or configure the S3 storage you can continue below.
¶ E. Optional: Backup Policy Setup
¶ Objective
At the end of this section you will have a policy that automatically retains 5 rotating backups, allowing you to seamlessly restore from backup should something ever go wrong and know how to restore from backup when needed.
¶ Set Backup Policy and Attach to Volume
E1. Sign into your Oracle Cloud account, and from the Get Started page click on the three bars on the top left to open the menu. Click on Block Storage -> Backup Policies.
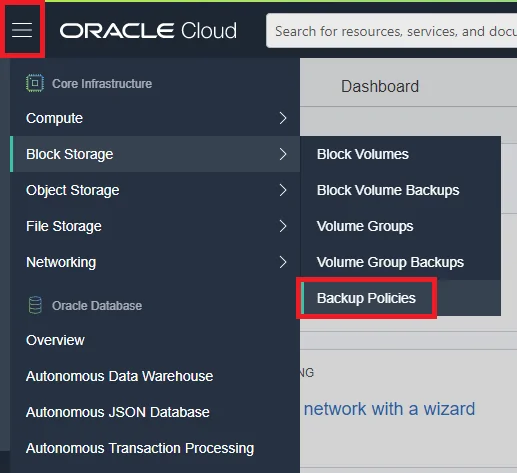
E2. Click Create Backup Policy.
E3. Enter a name such as foundry-backup. Leave all other options default.
E4. Click Create Backup Policy.
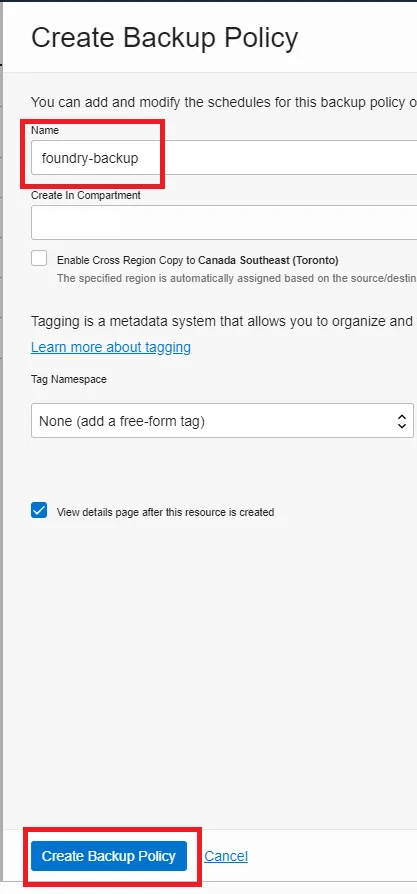
E5. Click Add Schedule.
E6. Enter the following options (or change as you see fit):
- Schedule Type:
Weekly - Day of the Week:
Monday - Hour of the day:
03:00 - Retention Time in Weeks:
5 - Backup Type:
Incremental - Timezone:
Regional Data Center Time
This schedule will set a rotating backup of 5 weeks, with the oldest week being deleted as a new one is created after 5 weeks. You are able to set your own schedule as desired, however the Always Free Tier only includes 5 backups. If you exceed 5 backups, the oldest will be deleted regardless of the retention period.
E7. Click Add Schedule.
E8. Assign the backup policy to the existing volume on our Compute VM by clicking the menu button, and choosing Compute -> Instances.
E9. Click the Foundry instance.
E10. Scroll down the page, and click Boot Volume unde the Resources menu on the left side.
E11. Click the instance-xxxxxxxxx (Boot Volume) link under the Boot Volume Name heading.
E12. Click the Edit button near the top of the page, just under the instance-xxxxxx (Boot Volume) title.
E13. Scroll down the pop-out pane to Backup Policies, and select the foundry-backup policy from the dropdown. Click Save Changes.
E14. You have now given your instance a backup policy that will run automatically.
¶ Restoring From Backup
Note: Following the steps below in order requires that you have enough Always Free Tier resources available to have two instances and two boot volumes active at the same time. If you followed the guide exactly as above, this will be the case. If you have increased the CPU/RAM or Volume size above 2CPUs/12GBs or 100GB then you may be prevented from creating a new instance or boot volume or be charged a small amount for the time they are both active.
You can terminate the existing instance before step E17 to continue in this case. Be absolutely sure that you have a working backup if you choose to terminate the instance in advance. You risk losing all data if you terminate the instance and boot volume without a working backup.
Instructions for terminating the instance start at E24.
Some regions have limited availability for the
VM.Standard.A1.Flexshapes. If your region does not have A1 availability, you will not be able to create a new instance as in step E19. Check back periodicially for more resources to become available. It may take a few days.
E15. From the Oracle Menu, click Storage then Block Storage.
E16. From the side menu, click Boot Volume Backups.
E17. Find the backup you want to restore. Most recent backups should be at the top of the list. Click the three-dot menu on that backup and click Restore Boot Volume.
E18. In the popup window, enter a Name such as Foundry-restored for the boot volume and then select the same Backup Policy to ensure this new boot volume will continue to be backed up. Leave all other options as default.
If you do not have enough Always Free Tier resources for the above step (ie: existing boot volume above 100GB) you may be prevented from completing E17-E18 entirely, or may be charged money while both boot volumes are active.
E19. In the new Boot Volume Details window, wait for the boot volume to become available and then click Create instance.
E20. Give the instance a name, such as Foundry-restored. Scroll down to verify the Shape indicates VM.Standard.A1.Flex with 1 core OCPU and 6 GB memory. The Image should be the Boot Volume Name set in step E18.
Do not modify the image.
E21. Scroll down to Add SSH Keys and click Save Private Key. Save this key in a safe location, preferrably the same location as you previously saved the SSH key. You will need this key if you ever want to connect to your instance via SSH in the future.
E22. Click Create. You now have a new Always Free A1 instance running that should not be disabled again.
If you do not have enough Always Free Tier resources for the above step (ie: existing boot volume above 100GB) you may be prevented from completing E19-E22 entirely, or may be charged money while both boot volumes are active.
E23. If you set up a domain name, you will need to point the domain's A record to the instances <Public IP address>. If you did not set up a domain name, you can now connect to Foundry directly, using a link like this: http://<Public IP Address>:30000
E24. Once you have verified the new instance works correctly and contains the restored data, use the Oracle Menu to navigate to Compute -> Instances.
E25. On the old instance that is no longer needed, click the three-dot menu and click Terminate.
E26. In the window that pops up, make sure that Permanently delete the attached boot volume is checked. Click Terminate Instance.
Be absolutely sure that this is the old instance and that your restored backup is functioning correctly before terminating. Terminating the instance will permanently delete it and all the data contained.
You should now have a working restored backup.
¶ F. Optional: Accessing Userdata Files
¶ Objective
If you would like to access the files in your userdata directory directly to move, delete, manage, or bulk upload, then we will need to set up Cyberduck, Nemo, Nautilus or VSCode to do so.
¶ Install and Setup Cyberduck
F1. Download and install Cyberduck for your platform from the Cyberduck website.
F2. Once installed, open Cyberduck and click Open Connection:
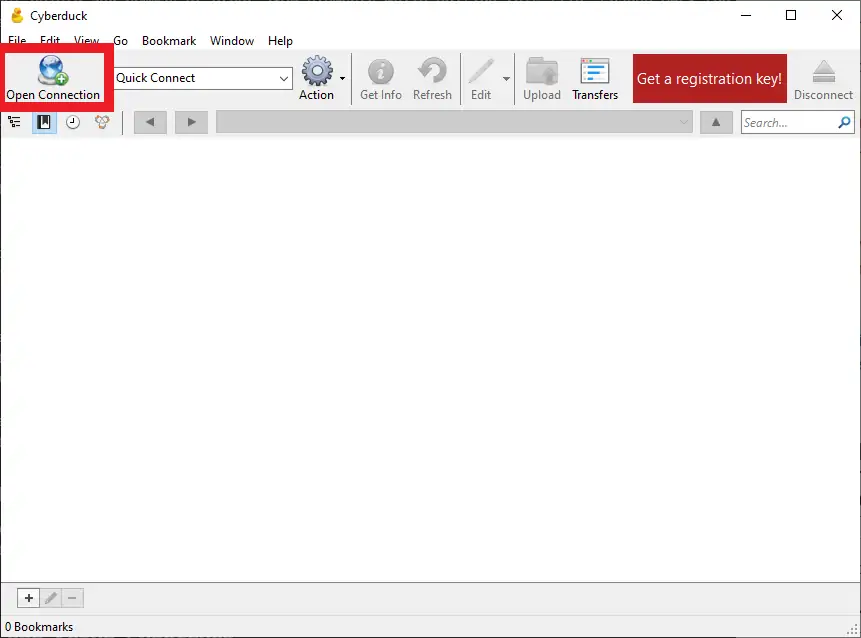
F3. In the Open Connection window, click the dropdown menu and select SFTP (SSH File Transfer Protocol)
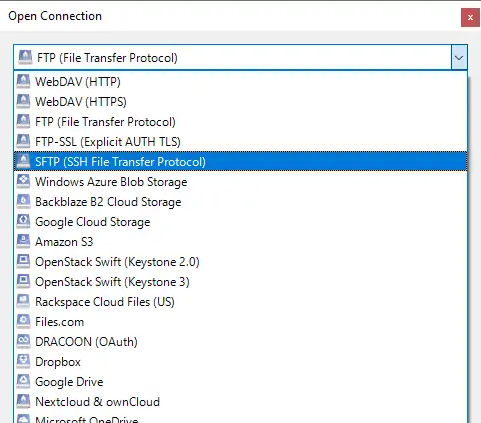
F4. Enter the following information in the corresponding fields, replacing any values in <> with the values as earlier in the guide:
- Server:
<your.domain.name>or<server IP address> - Username:
ubuntu - Password: Leave blank
- SSH Private Key: Click
Browseand select yourfoundry.keyfile. You may need to change the file type to All Files.
F5. Click Connect
F6. Double click on the foundryuserdata directory, then the Data directory.
F7. Click the Bookmark menu, then New Bookmark. Close the window that pops up.
You now have a bookmarked connection in Cyberduck to the location of your Foundry userdata directory. Simply launch Cyberduck and double click the bookmark to connect and manage your files.
¶ Nemo or Nautilas
Linux users won't be able to install CyberDuck, but they don't need to, because they can simply connect to their server within their File Browser.
This section is for Linux users only. Windows and MacOS users can use Cyberduck above.
F8. Move the foundry.key file that you created earlier in this guide to your ~/.ssh directory, then open a terminal there.
F9. Create a new .pem file from it:
openssl rsa -in foundry.key -text > foundry.pem
F10. Edit your .ssh config:
gedit ~/.ssh/config
Add this entry:
Host foundry
  HostName <public ip address>
  User ubuntu
  Port 22
  IdentityFile ~/.ssh/foundry.pem
  Compression yes
F11. Update the permissions of the new .pem file and the .ssh folder:
sudo chmod 600 foundry.pem
sudo chmod 755 ~/.ssh
F12. Open your File Browser.
¶ Nautilas
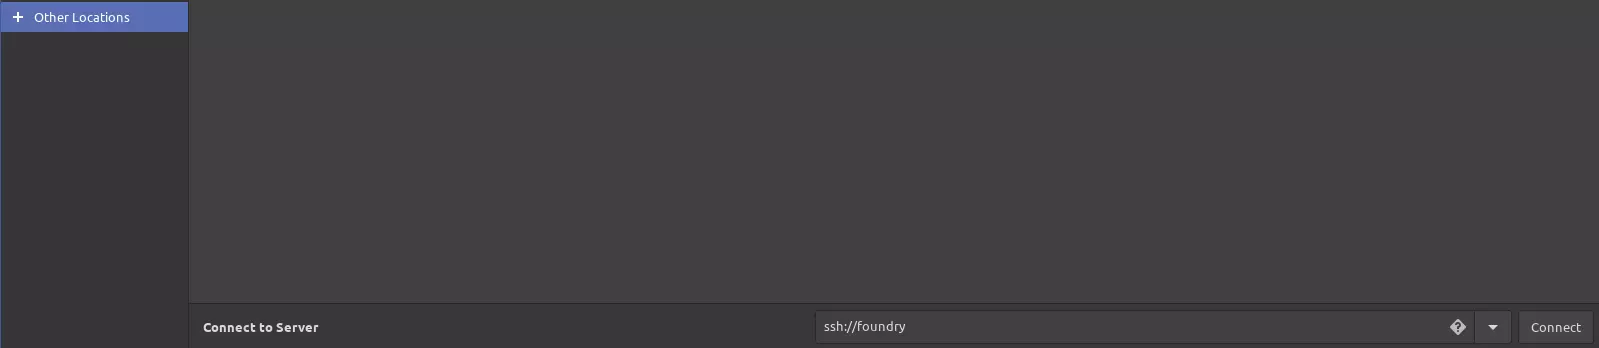
Go to "Other Locations" and enter ssh://foundry in the the text field on the bottom.
¶ Nemo
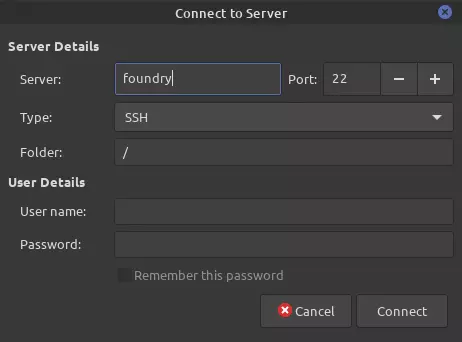
Go to File -> Connect to Server... and then enter foundry where it says server:
¶ Install and Setup VSCode
Visual Studio Code is a full featured, free IDE from Microsoft. With the support of the remote coding extension (also from Microsoft), you gain a full remote editor and file transfer platform. This allows you to remotely edit files and is a more complete service for power-users who may also be developing modules or wish to run services in addition to Foundry on the server.
F13. Download and install VSCode for your platform from the Microsoft VSCode website.
If on Windows you will also need to install the OpenSSH Client:
Open Settings, select Apps, then select Optional Features
At the top of the page select Add a feature, then findOpenSSH Client, and select Install
F14. Install the free "Remote - SSH" extension from the VSCode Marketpace Page, ensuring you click the blue Install button.
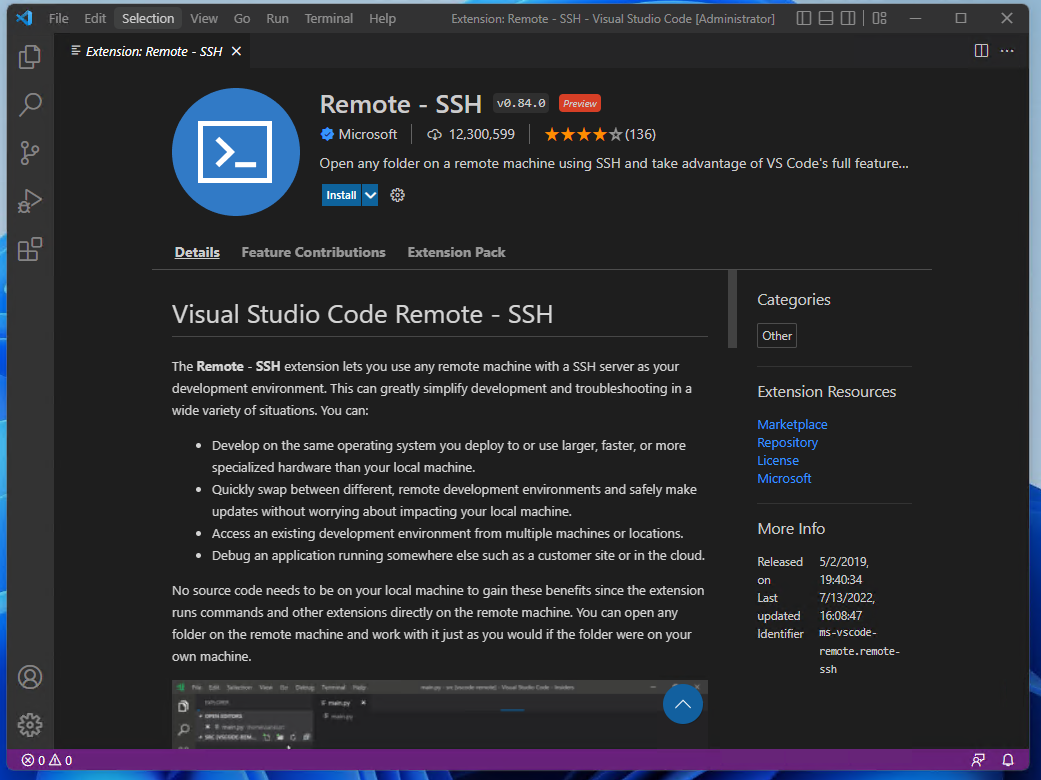
F15. Press Ctrl + Shift + P to open the command palette and search for Open SSH Configuration File, selecting the one for your user account.

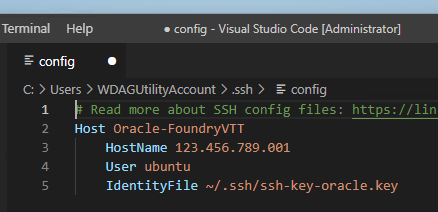
F16. Fill in the config file with a name for your Server (Host), the public IP address of your server (HostName), your username (Ubuntu by default). Add a new line with an IdentityFile followed by the path to your ssh key file.
Make sure to save the config file either with Ctrl + S or through a menu.
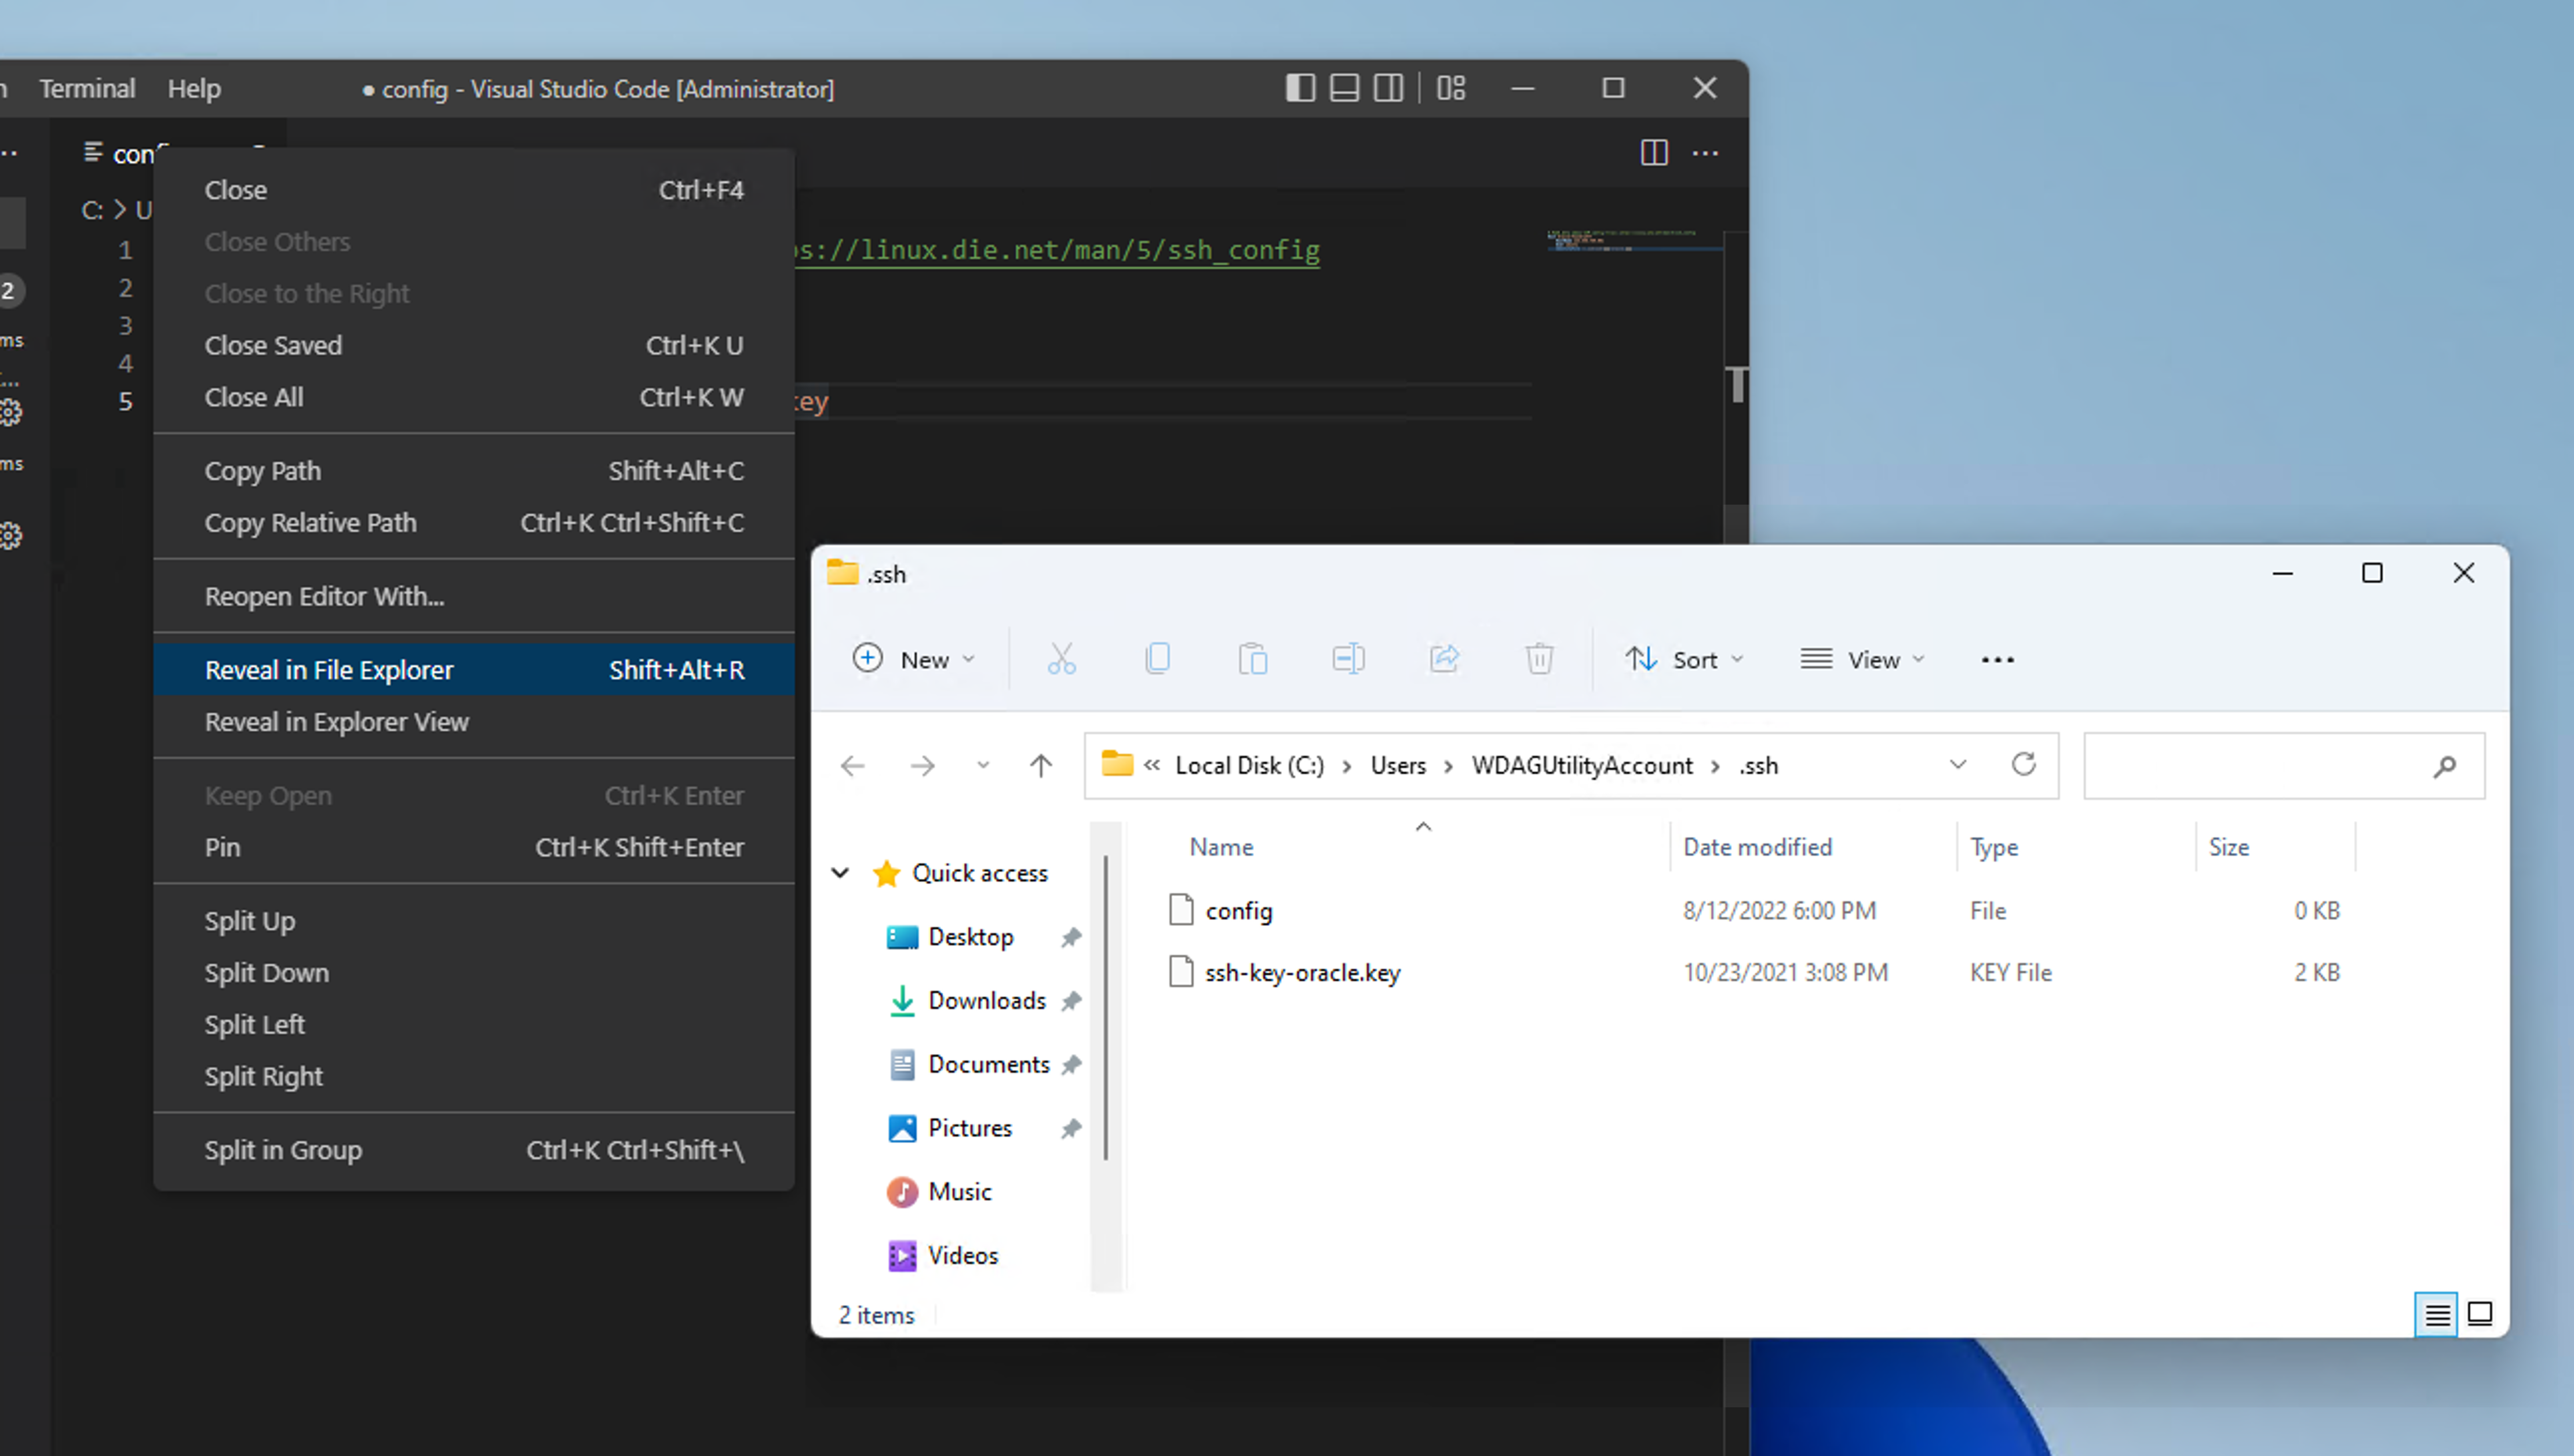
F17. For convenience we will store the key in the same folder as the configuration file, get there by right clicking on the config file name and selecting "Reveal in File Explorer" / "Reveal in Finder".
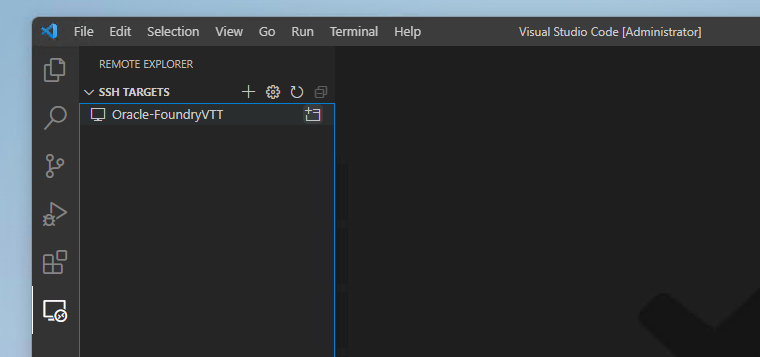
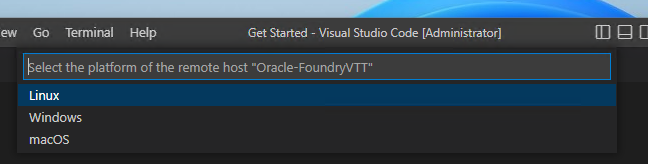
F18. Now that the connection is setup, go to the Remote Explorer tab in the sidebar and click the folder icon next to your server. If you get a popup asking you to chose the Operating system of the server choose Linux.
F19. A new window will open with the name of your server in the bottom left hand corner. Use the Open Folder button to open your foundrydata folder. Congratulations, you now have access to a file editor, a file tree you can drag and drop files into and out of, and a terminal connected to your server.
¶ G. Optional: Budget and Cost Analysis
¶ Objective
At the end of this section you will confirm that your instance will not incur any charges and optionally set up a warning if charges do occur.
¶ Costs
All resources mentioned and configured in this guide are Always Free and should never incur any costs over the lifetime of the account. If all steps were followed carefully, the Cost Analysis below should always show no costs projected.
In the case that the Cost Analysis shows some cost projected either a non-free resource was created, or the A1 instance was created above the Always Free tier limits, or there is some kind of error on Oracle's end.
If you see a projected cost from the Cost Analysis and are within 30 days of account creation then contact Oracle Support by clicking the Help button at the top-right of the screen, and starting a chat or creating a support request.
¶ View Cost Analysis
G1. Open the Navigation Menu and click Governane & Administration -> Cost Management -> Cost Analysis
G2. On the Cost Analysis page, click to check the Show Forecast option. This enables displaying future costs.
Accounts must be at least 10 days old to access the
Show Forecastfeature and may only forecast into the future the age of the account. For example, an account that is 11 days old can only forecast 11 days into the future.You may still conduct a Cost Analysis to confirm no costs have been incured in the recent past witout forecasting into the future.
G3. Choose the Granularity, either Daily or Monthly.
G4. If forecasting, set a date many days or months into the future under End Forecast Date (UTC).
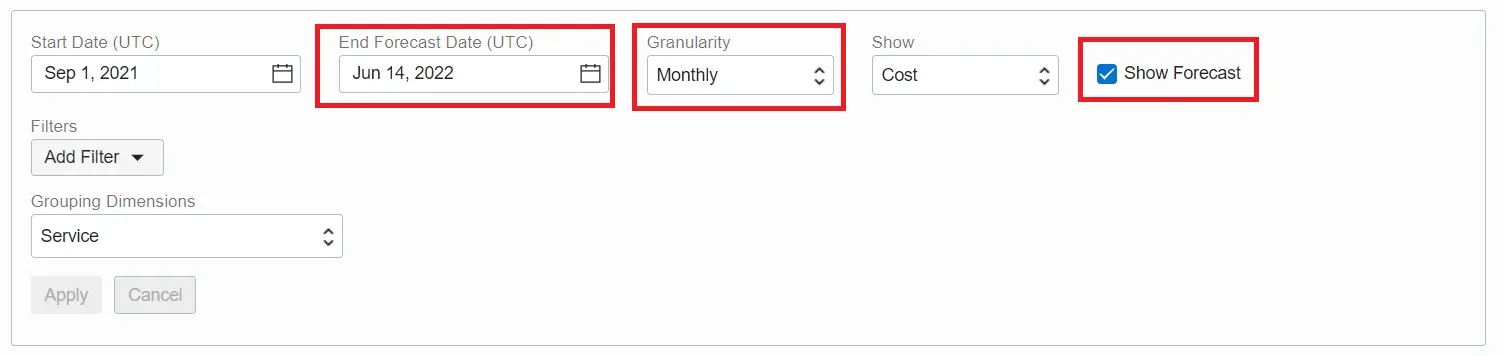
G5. Click Apply.
Note that it may take a few moments for the Cost Analysis to generate.
G6. Once it has finished generating, review the Cost Details. You should see a completely empty chart and a table with only zeroes, indicating no costs incured at any point including in the projected future.
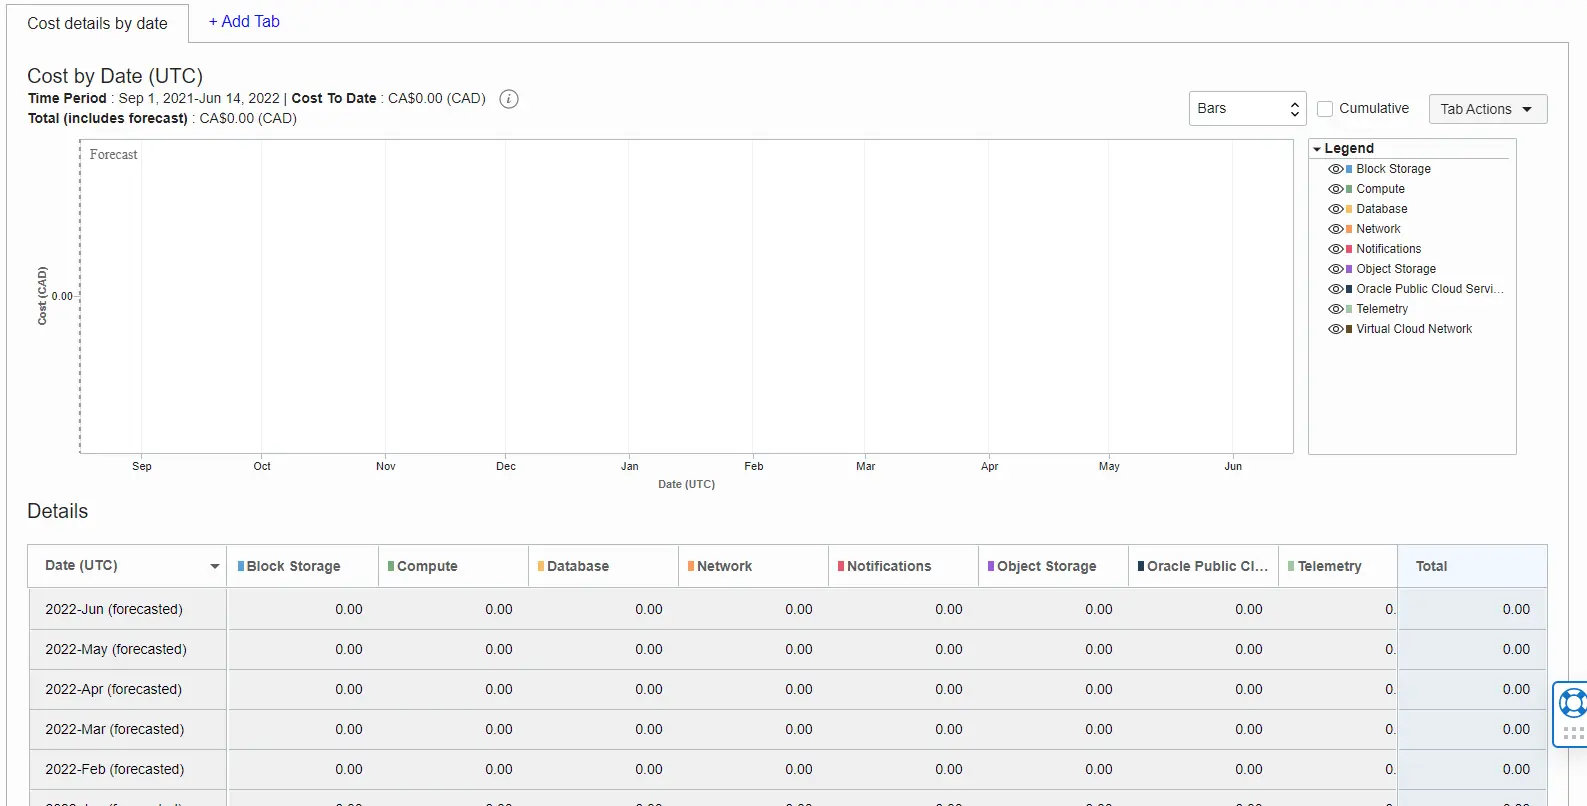
If you see any projected costs here, please review all the services you've set up to ensure they have an
always-freetag. If you are within 30 days of your account creation, please contact Oracle Support for further assistance.All steps in this guide have been carefully written to ensure that only
always-freetagged resources are used and should not have any costs associated with them.
¶ Set Budget Warning
G7. On the same Cost Management page as above, click Budets.
G8. Click Create Budget.
G9. Enter foundry_budget in the Name field.
G10. Enter Budget warning for Foundry cost forecast in the Description field.
G11. Under Target Compartment choose your root compartment.
G12. Under Monthly Budget Amount enter 1.
G13. Under Budget Alert Rule (Optional) -> Threshold Metric choose Forecast Spend to warn on upcoming charges.
G14. Under Threshold % enter 1 to warn on minimum forecast charges.
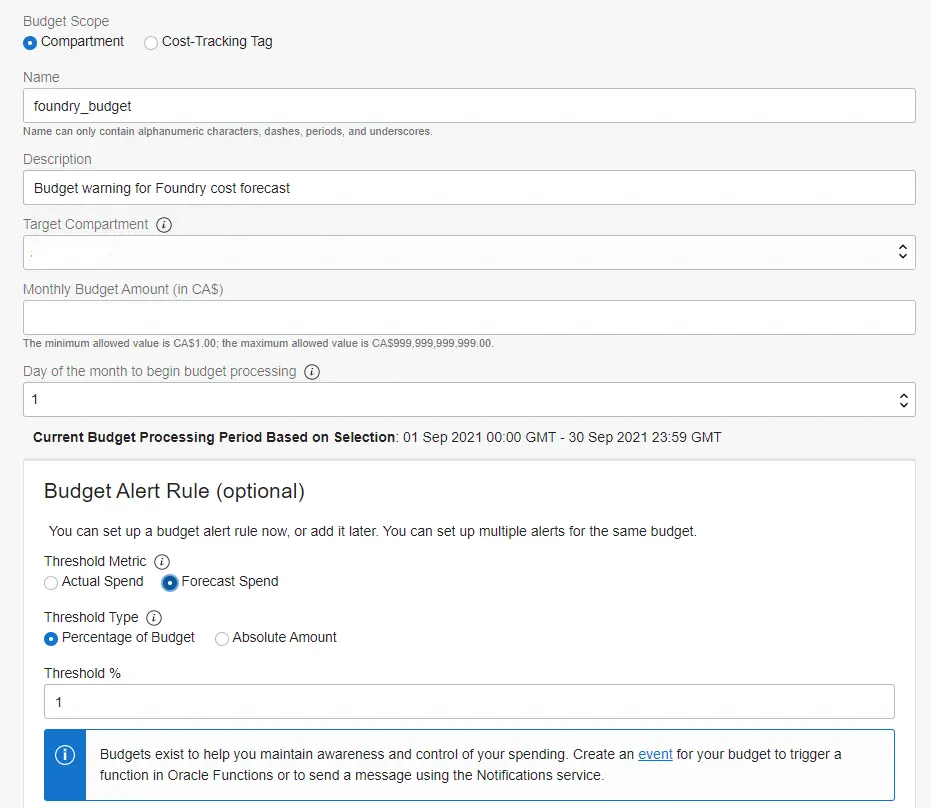
G15. Enter any Email Recipients where you would like to receive these warnings.
G16. Click Create.
You now have a warning that will send you an email on the first of the month if there are any projected costs whatsoever.
¶ H. Optional: Updating NodeJS Version
¶ Objective
If you have a message from Foundry telling you that you must updated your NodeJS version, this section will walk you through how to do that. At the end of this section you'll have the latest NodeJS version installed and Foundry up and running.
¶ Updating NodeJS
H1. Reconnect to your Oracle instance, as in step D2.
H2. Once successfully connected, follow the the updating steps as outlined in the Recommended Linux Install Guide.
Once completed, you are good to go!
¶ I. Optional: S3 Storage Setup
¶ Objective
At the end of this section, you will have a functional S3 storage bucket that Foundry can access to store assets under the “Amazon S3” tab in the file picker. This allows you to have extra storage beyond that provided by the instance volume and serve large assets more efficiently.
S3 storage can provide a way for large assets to be served to players in a more efficient way than from the instance created earlier in this guide. In most cases, Foundry scenes should load quickly without using S3. Setting up an S3 store is only recommended in cases where faster loading speeds or more storage space is required.
This section has been removed since reports of it not playing well within Foundry. Once a fix has been found, it will be modified and updated. If an S3 store is desired/needed, please look into setting up an AWS S3 store.
¶ J. Restore Disabled A1 Instance
¶ Objective
This section helps users who have had their A1 Ampere instances disabled at the end of the trial account period. These instances are still Always Free and can continue to be used. Once restored as described below, the instances should remain running without issue or fear of being disabled.
To see why the instance has been disabled, check step B4 in the archived information.
¶ Restore Instance Including All Data
To create a new instance that retains all data up to the point it was disabled:
J1. To be safe, create a backup of your Boot Volume by going to Compute -> Instances -> <Instance Name>
J2. Scroll down to Boot Volume -> Click the <Boot Volume Name>
J3. Scroll down to Boot Volume Backups and click Create Boot Volume Backup. Enter a name for the backup, and click Create Boot Volume Backup. This backup is not technically needed, but is good to have just in case.
J4. Go to Compute -> Instances and click on the Foundry instance. Click More Actions and choose Terminate. Make absolutely sure that Permanently delete the attached boot volume is NOT CHECKED.
J5. Wait for the instance status to change from Terminating to Terminated. You may need to refresh the page.
J6. Scroll down to Boot Volume and click the <Boot Volume Name>.
J7. At the top of the page, click Create Instance.
J8. Give the instance a name, such as Foundry. Scroll down to verify the Shape indicates VM.Standard.A1.Flex with 1 core OCPU and 6 GB memory. The Image should be the Boot Volume Name.
Optionally, you can edit the shape to be up to 4 core OCPU and 24GB memory. As part of the
Always Freeservices, you get up to 4 core OCPU and 24GB of member spread over up to 4 A1 instances. Please allocate accordingly.Do not modify the image.
J9. Scroll down to Add SSH Keys and click Save Private Key. Save this key in a safe location, preferrably the same location as you previously saved the SSH key. You will need this key if you ever want to connect to your instance via SSH in the future.
J10. Click Create. You now have a new Always Free A1 instance running that should not be disabled again.
J11. If you set up a domain name, you will need to point the domain's A record to the instances <Public IP address>. If you did not set up a domain name, you can now connect to Foundry directly, using a link like this: http://<Public IP Address>:30000
¶ K. Perform Clean Update/Reinstall
¶ Purpose
This section contains the instructions needed to remove the current installation, and replace it with a cleanly installed new version. It does not touch your userdata in any way.
¶ Clean Install
K1. Reconnect to your Oracle instance, as in step D2.
K2. Once successfully connected, follow the the updating steps as outlined in the Recommended Linux Install Guide.
¶ L. Archived: A1 Disabling and Upgrading to Pay As You Go (Reference Only)
¶ Purpose
This section contains outdated information, left here for reference only. This information is outdated and should only be used to reference previous instructions for informational purposes.
¶ Archived Information
The section below is reproduced as it was written before January 20th, 2022.
B4. Added September 2021: Due to changes in the way trial accounts work, accounts must be upgraded to Pay As You Go accounts to retain services long-term without interruption. This guide is specifically written to use only Always Free services that will not incur any charges on a Pay As You Go account.
Why do I need to upgrade my account to Pay As You Go? ▼
As of September 2021 (possibly earlier), Oracle terminates the Always Free A1 Ampere instances used in this guide after roughly 60 days unless an account has been upgraded to Pay As You Go. This is confirmed in their FAQ under the What happens when my Free Trial expires or my credits are used up? heading:
Resources identified as Always Free will not be reclaimed. After your Free Trial expires, you'll continue to be able to use and manage your existing Always Free resources, and can create new Always Free resources according to tenancy limits.
However, Ampere A1 Compute instances are disabled when your trial ends and then deleted (terminated) after 30 days, unless you upgrade to a paid account. To continue using Arm-based compute instances as an Always Free user, you must delete your existing Ampere A1 Compute instances and create new Ampere A1 Compute instances.
(Text quoted 2021-09-14)
In order to avoid data loss and service interruption, the upgrade to Pay As You Go must be done before the A1 instance is disabled.
Won't I be charged money if I upgrade my account to Pay As You Go? ▼
If you use only resources tagged with the Always Free tag, you will never be charged for them regardless if you have a trial account or a Pay As You Go account. This guide has been written to only use those specific resources.
See What are Always Free services? and Always Free Resources.
When upgrading your account to Pay As You Go, you may see temporary authorization charges on your credit card (depending on region). These charges should be released within a few days once the authorization is complete.
We recommend conducting a Cost Analysis after completing this guide for peace of mind. The account must be a minimum of 10 days old to conduct a cost analysis forecast.
If you see any other charges on the credit card, contact Oracle support.
Can I continue without upgrading to Pay As You Go / What happens if I don't upgrade to Pay As You Go? ▼
You can continue to use this guide and set up all the services without upgrading to Pay As You Go. As per the Oracle Always Free FAQ, your A1 instance (the cloud server you set up that runs Foundry) may be disabled and eventually deleted if you don't upgrade to Pay As You Go. See What happens when my Free Trial expires or my credits are used up?
You can set everything up in this guide without upgrading to Pay As You Go immediately, however if you don't do so before your A1 instance is disabled you risk losing data and would need to re-set up your server.
We recommend upgrading your account now so that you do not risk having services disabled, however you are free to choose when/if you upgrade your account.
We highly recommend setting up backups in Section E Backup Policy Setup to minimize potential data loss.
I choose to NOT upgrade to Pay As You Go ▼
You can continue to follow this guide without upgrading to Pay As You Go. All the services will work without issue for at least the first 30 days since your account creation.
After the first 30 days, your A1 instance will be disabled. This instance is what Foundry is running on. Your Foundry will become inaccessible and it will look like your Foundry installation is down.
After an additional 30 days, the Foundry A1 instance will be deleted (terminated) including any data that is not backed up.
After that point, you must delete the existing A1 instance, and recreate a new A1 instance (pending availability in your region) and attach it to your existing Boot Volume (or a volume restored from backup).
Instructions on how to restore from backup can be found in the Oracle Documentation.
If you'd like to continue without setting up a Pay As You Go account, skip ahead to Compute and Networking Setup.
My instance was disabled! ▼
If your instance has been disabled, you must create a new A1 instance to continue using the Always Free Tier. You can keep the same boot volume and all data on it.
Please follow the steps in the Restore Disabled A1 Instance section.
B5. Open the navigation menu and click Governance & Administration -> Cost Management -> Payment Method.
B6. Under Account Type, select Pay As You Go.
If you get a message that
this account is manage by enterprise agreementandupgrade operation is not availablethen your account has not finished provisioning. Please wait a few minutes until your account has finished provisioning.If your account does not complete provisioning after 30 minutes, please contact Oracle support
B7. If present, Edit your current credit card information or Add a new credit card. Click Finish when completed.
B8. Read the terms and conditions and check the check box to indicate your agreement.
Read carefully. Starting a Pay As You Go account may require temporary authorization charges to be made against your credit card.
B9. Click Start Paid Account.
B10. Once you complete the remainder of this guide, be sure to review a Cost Analysis to ensure that no costs will be incured. The account must be at least 10 days old to forecast costs into the future, but you may view past costs before that date as confirmation.
The text above this point is archived text from before January 20, 2022.