¶ Recommended Linux Installation and Usage Guide
¶ A. Overview
¶ Objective
This guide provides easy to follow steps for installing and using Foundry as a headless server in a linux environment. It is written to account for a number of linux common linux distributions and installation scenarios.
At the end of this guide you will have:
- Foundry server running 24/7 behind a reverse proxy providing HTTPS, including automatic restarts
- A domain name pointing to the server
- (Optional) Cyberduck, a file transfer program, configured to manage user data of the Foundry server
- (Optional) A swapfile set up to help in low-RAM (2GB) instances.
¶ Important Information and Requirements
This guide assumes that you have already installed linux, and have at least a basic understanding of linux and how to use a command line.
The following is required to complete this guide:
- An existing server with a modern 64-bit Linux distribution installed with a minimum of 2GB of RAM, for example:
a. A linux PC on your home network. See note on Port Forwarding
b. A linux virtual machine on any host.
c. A linux virtual private server or dedicated server in the cloud. - A basic understanding of using a terminal that includes the ssh utility, such as:
a. Powershell in Windows.
b. Terminal in Linux or macOS. - Valid domain name, such as:
a. A purchased domain name from a registrar like Namecheap or gandi.net.
b. A free subdomain from a free domain name service like Duck DNS.
The Foundry minimum requirements are 2GB RAM with 4GB recommended. Note that if you have other applications/services/etc that are using RAM in addition to Foundry, please consider more than 2GB. Essentially any CPU with at least one core should work.
¶ Port Forwarding
If you are planning to host on a PC on your home network, please double check that you are able to port forward. This guide assumes that you have already confirmed the ability to host on your home network, and set up port forwarding (if needed).
If hosting on a PC on your home network, confirm your ability to host before continuing with this guide.
See the Foundry documentation on Port Forwarding for more info. You'll need to forward port 30000 (TCP) for just Foundry access, or 80 (TCP) and 443 (TCP + UDP) if using Caddy reverse proxy.
This guide does not cover port forwarding, nor is it an alternative to port forwarding. If hosting on your PC at home over IPv4, you will need to port forward.
¶ Preferred Linux Distribution
This guide includes instructions for a number of linux distributions, as described below. If you do not have a strong reason for another distribution, we recommend Ubuntu 24.04.
This guide supports most distributions based on Debian 11 or 12, including:
- Debian
- Ubuntu
- 64 bit Raspberry Pi OS
Any distribution that uses the apt package managers should be compatible with this guide, as long as the Distributions and Installations Types to Avoid section is followed.
Arch-based (such as CachyOS), Redhat/Fedora-based, containorized distros, or any distro that does not use the apt package manager is not supported by this guide.
¶ Distributions and Installation Types to Avoid
-
Amazon Linux 2
This AWS-specific distribution does not support Node 18+, and also includes a number of changes and customizations that are specific to AWS and are out of scope of a simple Foundry hosting setup. -
NixOS or similar containerized / declarative distributions
These distributions may work to host Foundry, but the instructions below will not work. They require specialized setup. -
Legacy or 32-bit Raspberry Pi OS/Raspbian
Current 64-bit Raspberry Pi OS works and is recommended, but older or 32-bit versions have limited support for newer Node versions or could bump into limitations down the line. -
Any distribution or setup that pre-installs a graphical web interface, admin management console, or other server management system
This guide is NOT compatible with setups that include Plesk, Webmin, cPanel, DirectAdmin, Virtualmin or similar locked down systems intended to be configured by GUI only.
This guide requires 64 bit Debian 11 or 12 based distributions or higher. Using lower versions may not function properly. 32 bit OSs will have issues with RAM and NodeJS heap size.
¶ Getting Help
If you get stuck on a particular step, please first ensure that all commands in black text quotes entered exactly as they appear. If multiple commands are included in the black text quotes, copy and paste each line individually and ensure it completes before moving on to the next line.
Troubleshooting assistance for this guide can be found on the official Foundry Discord. Copy the link from the specific step number (ie: C5) you are having difficulty with and then post in the #install-and-connection channel on the Foundry Discord.
¶ B. User and General System Setup
¶ Objective
At the end of this section, you will have a non-root user setup to run Foundry as well as the necessary software to run Foundry managed behind a reverse proxy.
This section assumes that you are connected via terminal to your linux server. This can be either throught direct local access to a terminal or through ssh.
How to connect to your server is out of scope for this guide. You should have terminal access if you installed linux on a local pc, or if you are using a cloud VPS/VM provider then review their documentation for how to get
sshorterminalaccess to your instance.
¶ User Setup
We must use a non-root user that is part of the sudoers group to properly continue and manage Foundry.
If you are certain that you have a non-root user that has access to
sudothen you may skip the next steps and continue to System Setup.
B1. Firstly, check your terminal to determine which user you are logged in as. Your terminal should look like:
<user>@<servername>:_
B2. The <user> field will show you which user you are connected as. If it shows root then we need to create a new user and add them to sudoers. If the user is NOT root then you can skip and continue to step B5.
Any references of
<user>in the rest of the guide should be replaced withfoundryin this case.
B3. Click the heading for your linux distribution to expand the commands to create a new user. We will create a user named foundry and add them to sudoers. Choose a strong password for the user that you will remember.
You can leave all other fields blank or fill with whatever info you'd like.
adduser foundry
usermod -aG sudo foundry
B4. Assume the new user by:
su - foundry
You should now see the terminal look like:
foundry@<servername>:_
¶ System Setup
We will now install the necessary software to run and manage Foundry behind a reverse proxy. This includes:
nodejs, required to run Foundry itselfcaddy, the webserver that will be used as a reverse proxypm2, the process manager that will keep Foundry runningunzip, the utility used to decompress the Foundry installation zip archivenano, the text editor used to edit configuration files
To continue, you must be using a non-root user with
sudoaccess. If that is not the case, please review the steps in User Setup.
B5. First, let's update the system to make sure we have everything as up-to-date as possible. This may take a few minutes.
sudo apt update
sudo apt upgrade -y
You may be asked for a password the first time you use a
sudocommand. This is normal. Enter the password for the user.
If after entering the correct password, you receive an error:
<user> is not in the sudoers fileor similar, then you must login as root and complete ther User Setup.
B6. Install nodejs v24 using nvm:
Foundry v14 requires NodeJS 24. Earlier versions of Foundry are not compatible with NodeJS 24. See the Compatibilty Table for version info and Section I. Multiple Instances for how to run multiple instances of different versions of Foundry.
curl -o- https://raw.githubusercontent.com/nvm-sh/nvm/v0.40.4/install.sh | bash
\. "$HOME/.nvm/nvm.sh"
nvm install 24
B7. Add the caddy repository to the system package manager:
sudo apt install -y debian-keyring debian-archive-keyring apt-transport-https
curl -1sLf 'https://dl.cloudsmith.io/public/caddy/stable/gpg.key' | sudo gpg --dearmor -o /usr/share/keyrings/caddy-stable-archive-keyring.gpg
curl -1sLf 'https://dl.cloudsmith.io/public/caddy/stable/debian.deb.txt' | sudo tee /etc/apt/sources.list.d/caddy-stable.list
B8. Install, caddy, unzip, nano, and ncdu:
The
ncduutility is installed here simply to have on hand. It is a handy tool to find folders taking up space.
sudo apt update
sudo apt install caddy unzip nano ncdu -y
B9. Check that nvm, nodejs, and npm are installed and the correct versions:
nvm --version
node --version
npm --version
node should return a version of 24 or greater. The npm and nvm versions don't matter, but should return something.
B10. Install pm2:
sudo npm install pm2 -g
B11. Add pm2 to startup as the current user. Be sure to carefully read the blue notice and follow all instructions given:
pm2 startup
REQUIRED STEP
You will need to carefully review the output of thepm2 startupcommand. It will include a specific instruction on how to enable pm2 startup on your particular distribution. Copy and paste this command exactly.
¶ C. Foundry and Reverse Proxy Setup
¶ Objective
At the end of this section you will have a functional installation of Foundry using HTTPS and Caddy as a reverse proxy. Foundry will be set to restart any time the server is restarted, managed by pm2.
¶ Download, Install, and Test Foundry
C1. Login to FoundryVTT and navigate to the Purchased Licenses page.
C2. Select the recommended version and NodeJS in the downloads options. Click on the 
Timed URL button to copy a download url.
Be sure to click the
Timed URLand not the :download:Downloadbutton to copy and authenticated temporary download link. This link will expire in 5 minutes, after which it will need to be copied again from the gear.
C3. Run the following commands, pasting the download url where you see <download url>. In most terminals, you can right click to paste the copied url.
mkdir ~/foundry
wget --output-document ~/foundry/foundryvtt.zip "<download url>"
Make sure to include the quote symbols before and after the
<download url>or the file may not download properly.
C4. Once downloaded, extract Foundry and cleanup the zip file:
unzip ~/foundry/foundryvtt.zip -d ~/foundry/
rm ~/foundry/foundryvtt.zip
If you get an error when unzipping Foundry, please ensure you've downloaded the Linux/NodeJS version and if not, repeat step C2.
C5. Create the User Data folder for Foundry to store data:
mkdir -p ~/foundryuserdata
C6. Set the NodeJS version to 24, and test that Foundry runs successfully by running the following command.
cd ~
nvm use 24
node $HOME/foundry/main.js --dataPath=$HOME/foundryuserdata
Foundry v12 and earlier or MODULE NOT FOUND ERROR
The location of main.js changed for the NodeJS package (only) in Foundry v13 and onward. In all other packages, such as the Linux package, the launch command for main.js will need to be modified to:
node $HOME/foundry/resources/app/main.js --dataPath=$HOME/foundryuserdataBoth the command in this step and in C10 will need to be modified.
C7. You should see these info lines at the end of the output, indicating that Foundry is successfully running.
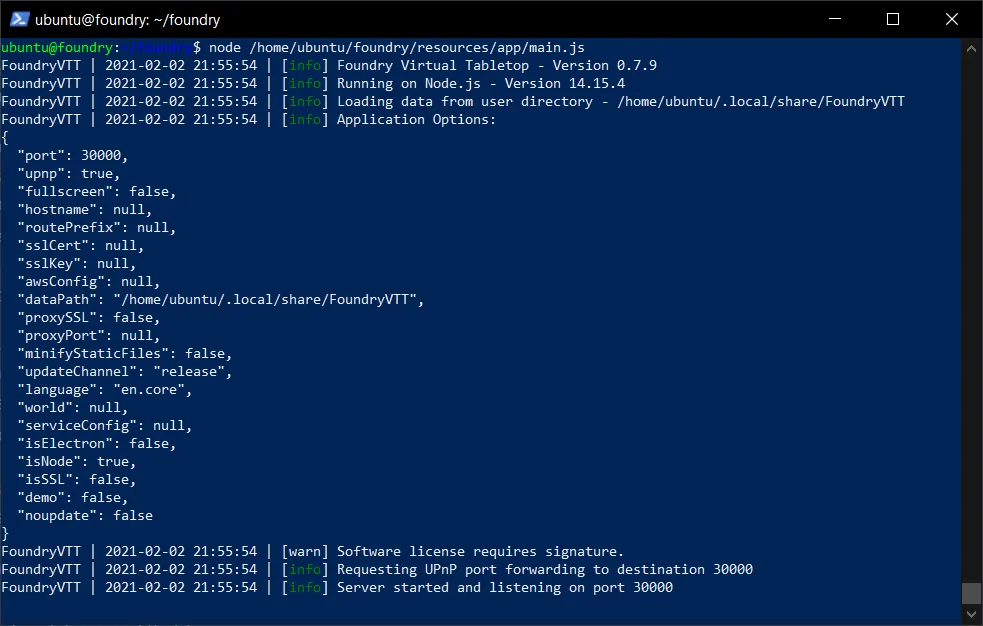
If you do not see the above output ending with
Server started and listening on port 30000, review step C6.
If you are installing on a Raspberry Pi, an ARM device or VM, or potentially some other UNIX OS and are seeing a GLIBC or DLOPEN error, see section H in this guide.
You may also see a Deprecation Warning such as
[DEP0040] DeprecationWarning: The punycode module is deprecated. Please use a userland alternative instead.. This warning can be safely ignored.
C8. Test the connection to Foundry by opening http://<IP address>:30000 in a new browser tab, where <IP address> is the either the external IP address of your cloud server or server internal IP address in your home network.
If you are setting up a server on your local network, use the local/internal IP address of the server. If you are setting up a server in the cloud, use the public IP address of the server.
You should see a Foundry screen asking for a license key at this point. If you do not see a Foundry screen at this point likely the your linux distribution or cloud provider has a firewall enabled that is blocking port 30000, or an incorrect IP address was used. Check the IP address carefully and otherwise review the documentation for your linux distribution or cloud provider for how to open port 30000 in the firewall.
C9. In the terminal window, press ctrl-c to stop the Foundry test. You should see the last few lines as below, and a blinking cursor at <user>@<server>:~$.
C10. We will now set Foundry to be managed by pm2 so that Foundry will always be running, even in the case where the instance has been restarted. To do so, run the following command:
pm2 start "node $HOME/foundry/main.js --dataPath=$HOME/foundryuserdata" --name foundry
C11. Double check pm2 has launched Foundry correctly:
pm2 list

If the status column does not show online then review step C10 above before continuing.
C12. Save the current pm2 configuration so that it can manage and restart Foundry as necessary:
pm2 save
¶ Set up the Caddy Reverse Proxy
We recommend that you have a valid domain name with an A record pointing to
<public IP address>to complete this section. If you do not have a domain name, you can use a service like Duck DNS to get a free domain and point it to<public IP address>. (see guide if you are hosting on a home network)Having a valid domain name results in an HTTPS connection without insecure connection warnings from your and your players' browsers.
If you do not have a domain name, you may continue with this section which will set up self-signed certificates for the bare IP connection to your host, allowing an HTTPS connection but one that will prompt browsers to show a warning before clicking through to connect.
C13. Run the following command to begin editing the Caddyfile:
sudo nano /etc/caddy/Caddyfile
C14. Delete all the text, and replace it with (making sure to replace the your.hostname.com portion with your actual domain name, do NOT put http:// or https:// in front of it). If you do not have a domain name, leave the text as-is without modification.
You can delete text in
nanoby using the arrow keys to move the cursor and pressing the delete or backspace keys to delete text.
Do not modify the
https:// { ... }block at all, whether you have a domain name or not.
# This replaces the existing content in /etc/caddy/Caddyfile

# A CONFIG SECTION FOR YOUR HOSTNAME

your.hostname.com {
    reverse_proxy localhost:30000
    encode zstd gzip
}

https:// {
    tls internal {
    		on_demand
    }

    reverse_proxy localhost:30000
    encode zstd gzip
}

# Refer to the Caddy docs for more information:
# https://caddyserver.com/docs/caddyfile
C15. Press ctrl-x then y and enter to save your changes.
C16. Restart Caddy to pick up the new settings by:
sudo service caddy restart
Caddy handles all forwarding to HTTPS as well as the encryption certificates. No further configuration is needed to get those working.
C17. Tell Foundry that we are running behind a reverse proxy by changing the options.json file. Open the file for editing by:
nano ~/foundryuserdata/Config/options.json
C18. Find the proxySSL and proxyPort parameters, and change them as below. Leave all other options as they are. The hostname parameter will tell Foundry to use a hostname in the Internet Invite Link. Replace <your.domain.name> with your actual domain name, if you have one. If not then do not modify the hostname field.
...
"proxyPort": 443,
...
"proxySSL": true,
...
"hostname": "<your.domain.name>",
...
Make sure your hostname is in quotes as above, and be sure not to delete any commas or other JSON elements while editing this file. Change ONLY the values afer the
:
C19. Press ctrl-x then y and enter to save your changes.
C20. Restart Foundry to pick up the changes to configuration:
pm2 restart foundry
C21. Test your site by opening a new browser tab to http://your.domain.name or http://server.internal.IP.address. Your browser may show a warning when connecting to the bare IP though you should be able to click through it. If everything is working, you will see Foundry load and the site will have the encrypted lock icon. It is now ready for use and no further configuration is needed.
Sometimes DNS records can take a few minutes and up to a couple hours to be recognized across the internet. If you receive an error along the lines of
server IP address could not be foundorhaving trouble finding that sitethen the DNS records may just need more time. Wait a few minutes and try again.If the connection is refused, you may need to open ports 80 and 443 in your OS firewall and then either your provider's network security settings (if cloud hosted) or through port forwarding on your router (if hosting at home).
If you are hosting on your home network, you must use an external device to test the connection to the domain name. You can only test the connection to the internal IP address from within the network.
This concludes the portion of the guide that sets Foundry up and running. You may now continue using Foundry this way without issue going forward.
¶ (Optional) D. Accessing Userdata Files with Cyberduck
¶ Objective
At the end of this optional section, you will be able to directly access the files in your userdata directory with Cyberduck. This is useful for moving, deleting, or bulk uploading assets for Foundry.
¶ Install and Setup Cyberduck
D1. Download and install Cyberduck for your platform from the Cyberduck website.
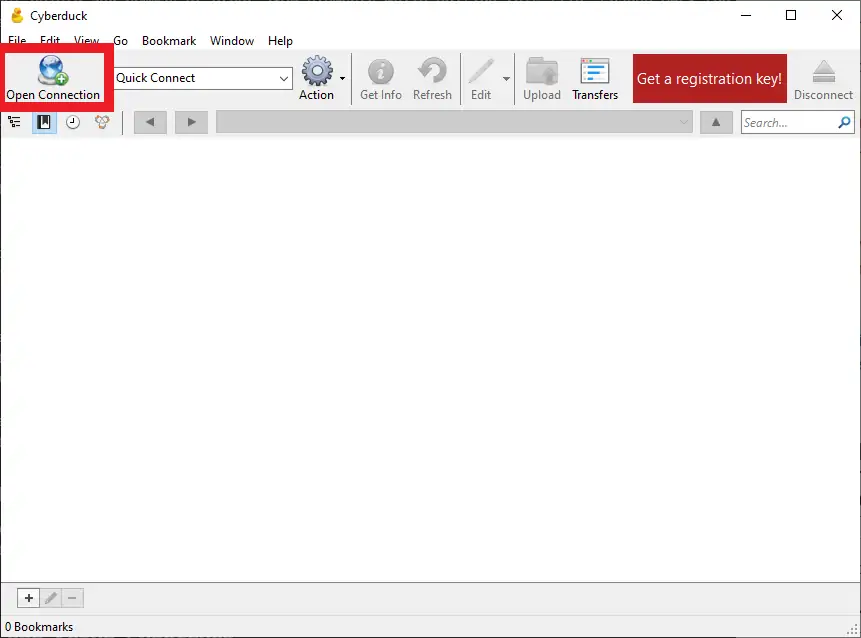
D2. Once installed, open Cyberduck and click Open Connection:
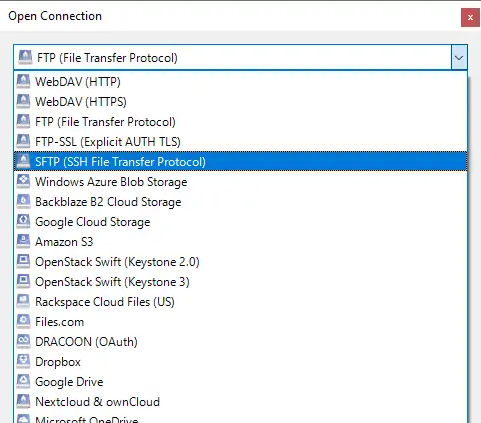
D3. In the Open Connection window, click the dropdown menu and select SFTP (SSH File Transfer Protocol)
D4. Enter the following information in the corresponding fields, replacing any values in <> with the values as earlier in the guide:
- Server:
<your.domain.name>or<server internal IP address>if hosting in a home network - Username:
<user> - Password:
<password>(Leave blank if your existing user needs an ssh private key file to connect) - SSH Private Key: Click
Browseand select your SSH Private Key file. You may need to change the file type to All Files. Leave blank if using a password only.
D5. Click Connect
D6. Double click on the foundryuserdata directory, then the Data directory.
D7. Click the Bookmark menu, then New Bookmark. Close the window that pops up.
You now have a bookmarked connection in Cyberduck to the location of your Foundry userdata directory. Simply launch Cyberduck and double click the bookmark to connect and manage your files.
¶ (Optional) E. Creating Swapfile
¶ Objective
The minimum RAM requirement for hosting Foundry is 2GB (4GB recommended), however some systems or modules may use more than the minimum RAM. If your linux host has 2GB of RAM you can create a swapfile to try and mitigate some out-of-memory errors when using heavier modules, systems, or large compendiums.
Creating a swapfile DOES NOT grant more RAM, or guarantee that Foundry will run on a system with less than 2GB of RAM. It can potentially, maybe, help in some circumstances. Running Foundry on a system with less than 2GB of RAM is still unsupported, even with a swapfile, and may result in crashing.
¶ Create and Enable Swapfile
The instructions below are compatible with the preferred linux distributions.
All commands below are assumed to be entered by a non-root sudoer user, such as the foundry user created in B1 to B4.
E1. Create a file to be used as swap:
sudo fallocate -l 2G /swapfile
This will create a 2GB swapfile which is a recommended size for hosts with 2GB of RAM. You can increase this size as you'd like, but it is not recommended to create a smaller swapfile.
E2. Change the permissions to prevent regular users from accessing the swapfile:
sudo chmod 600 /swapfile
E3. Mark the swapfile as a linux swap area:
sudo mkswap /swapfile
E4. Ensure that the swapfile is enabled permanently by editing the /etc/fstab file.
sudo nano /etc/fstab
E5. Paste the following line at the end of the fstab file while making sure the rest of fstab file is not modified. Press ctrl-x and then y, and then enter to save the changes to the file.
/swapfile swap swap defaults 0 0
E6. Enable the swapfile specified in fstab:
sudo swapon -a
E7. Verify the swapfile exists and is enabled:
sudo swapon --show
You should see an output like this:
NAME      TYPE      SIZE  USED PRIO
/swapfile file        2G    0B   -1
You now have a swapfile enabled and should be protected against out-of-memory errors.
¶ (Optional) F. Updating NodeJS
¶ Objective
As Foundry VTT is updated, the minimum requirements for NodeJS are also updated. If you've received a message stating that you must update NodeJS and you have used this guide (or similar guides, such as the Oracle Always Free guide, that use pm2 and the nodesource repo) then this section will describe how to update NodeJS to the latest version.
This section assumes you have one instance of Foundry running and is not compatible if you followed Section I. Multiple Instances.
¶ Updating NodeJS
This section assumes that you have set Foundry VTT to be managed by pm2 and have installed NodeJS through their repo as this guide describes. Please copy and paste the instructions carefully.
F1. Stop any managed pm2 processes.
pm2 stop foundry
F2. Remove the current pm2 from startup to allow for the upgrade.
pm2 unstartup
F3. Install the new nvm and NodeJS versions.
curl -o- https://raw.githubusercontent.com/nvm-sh/nvm/v0.40.4/install.sh | bash
\. "$HOME/.nvm/nvm.sh"
nvm install 24
F4. Set pm2 to use the upgraded version of NodeJS and set it to run on start again.
npm rebuild -g pm2
pm2 startup
F5. pm2 will list a command to run after the pm2 startup was run. Copy and paste that into the commandline and run it to ensure pm2 will launch on startup.
F6. Set the new NodeJS version and restart any previously running pm2 managed processes.
nvm use 24
pm2 start foundry --update-env
F7. Check that Foundry is online. The output should show a green online indicator beside the Foundry process.
pm2 list
F8. Save the current pm2 configuration.
pm2 save
You've now successfully updated NodeJS and should be good to go!
You may want to reboot your instance to apply all updates, such as a kernel update.
¶ (Optional) G. Performing a Clean Update/Reinstall
¶ Objective
This will guide you through the steps needed to clear a current installation, and download the install a fresh version of Foundry - either an update or the same version. Your userdata will not be touched or affected at all.
This section assumes you have one instance of Foundry running and is not compatible if you followed Section I. Multiple Instances.
¶ Archiving Current Install and New Install
Assuming that you have Foundry installed in ~/foundry and your userdata in a separate location (likely ~/foundryuserdata) and is managed by pm2.
G1. Once you have connected and navigated to your home directory ~, stop Foundry using pm2.
pm2 stop foundry
G2. Create a backup/archive of the current installation by moving the folder to a new location. You may need to name the destination folder something like foundry-archive-2023-06-02 in the case of multiple updates.
mv foundry foundry-archive
Back up your user data in case foundry overwrites the current folder. By following this guide, your user data folder should not be affected after a fresh installation, but it is for the best to keep a backup of that data.
G3. Create a backup of your user data by creating a zip file of its contents. You may need to name the destination folder something like foundryuserdata-2023-06-02.zip in the case of multiple updates. If the data inside your folder is extensive or your drive space is limited, you may need to find an alternative backup solution such as using rsync to copy the files to another device.
sudo apt install -y zip
zip -r ~/foundryuserdata.zip foundryuserdata/*
G4. Create the installation directory and download desired Foundry version using wget. You must use the Timed URL and the Node.js version. Be sure to wrap the URL with quotes below.
mkdir ~/foundry
wget --output-document ~/foundry/foundryvtt.zip "<download url>"
G5. Once downloaded, extract Foundry and cleanup the zip file:
unzip ~/foundry/foundryvtt.zip -d ~/foundry/
rm ~/foundry/foundryvtt.zip
G6. Restart Foundry using pm2.
pm2 start foundry
If you are UPDATING FROM v12 OR EARLIER to v13 or later, or are seeing pm2 error if you run
pm2 list, or Foundry generally fails to start:
Runpm2 stop foundry && pm2 delete foundry && pm2 flush, check you have the right version of node as per step G7 then run the commands in steps C10 through C12.
G7. Check your node version using nvm current against the minimum requirements. Head to section F. Updating NodeJS if you need to update NodeJS or see an error saying nvm not found.
G8. Double check that you don't have duplicate PM2 instances of Foundry attempting to run. Run:
pm2 list
You should see only one instance of Foundry listed there. If you see more than one when there shouldn't be, run pm2 stop all && pm2 delete all then return to steps C10 through C12. Once done, check pm2 list once again.
If you are installing on a Raspberry Pi, an ARM device or VM, or potentially some other UNIX OS and are seeing a GLIBC or DLOPEN error, see section H in this guide.
You should now have the new version of Foundry running and accessible as before!
¶ (Optional) H. GLIBC Error Fix
¶ Objective
This section addresses a common error on ARM or other non-x86/x64 architectures, including some Raspberry Pis. If you encounter the GLIBC error listed below, please read through this section to correct it and have Foundry launch.
¶ Foundry Fails to Launch with GLIBC Error
This section of the guide will correct the error where Foundry fails to launch, and you see this error (exact GLIBC version listed may be different):
Error: /lib/arm-linux-gnueabihf/libstdc++.so.6: version `GLIBCXX_3.4.29' not found (required by /home/foundry/foundry/resources/app/node_modules/classic-level/prebuilds/linux-arm/node.napi.armv7.node)
¶ Rebuild Classic-Level Database Engine
The GLIBC error is caused by the classic-level node package not having a compiled version distributed for glibc versions on some ARM or non-x86/x64 archictectues. You may also see this error if you are using a non-linux POSIX OS like FreeBSD or are using an older linux distribution.
To correct this error, we need to build classic-level ourselves manually.
The steps below assume you've followed the guide above to install and run Foundry, and you are logged in as the foundry user. If you didn't folow this guide, adjust accordingly to your own installation.
H1. Login as the user Foundry is running as and stop Foundry from running.
pm2 stop foundry
H2. Change to the installation resources/app/ directory.
cd ~/foundry/resources/app
H3. Run the npm command to build classic-level under the current glibc version and architecture.
npm install classic-level --build-from-source
You MUST execute that command in the
resources/app/directory in the Foundry installation. This fix will fail if you don't execute it in that directory..
H4. Relaunch Foundry.
pm2 start foundry
Foundry should now start properly without the GLIBC error!
¶ (Optional) I. Multiple Instances
¶ Objective
This section is for advanced users who are already familiar with how to host and run Foundry in linux with pm2. This section cannot be completed step-by-step without modifying each step to account for your particular install situation. It provides broad directions for getting multiple instances of Foundry running only. You must be able to understand the commands below and adjust accordingly.
This section describes how you should set up multiple Foundry instances without conflict, on the same host. It supplements the instructions in section C, so you'll need to adjust as you go keeping the instructions below in mind.
¶ Why Multiple Instances?
There are a few reasons to have multiple instances of Foundry going at the same time, for example:
- Having one gaming instance, and one "dev" instance with completely separate userdata locations to keep development away from "production."
- Wanting to use game systems with different Foundry major version requirements. Sometimes, game systems may take a while to be updated to the latest (or may never be) but you'd like to use that at the same time as an updated one.
- Testing game systems or modules on a new in-development version of Foundry without touching your existing userdata and installation.
Different versions of Foundry may require different versions of NodeJS, necessitating some method of managing multiple versions of NodeJS on your host in order to run multiple versions of Foundry at once. This section will install Node Version Manager (NVM) in order to do so.
This change means that you must manage your NodeJS install(s) with NVM going forward and cannot use the steps in section C of this guide to install or update NodeJS anymore. Only use this section of the guide moving forward.
¶ Compatibility Table
| Foundry Version | NodeJS Version |
|---|---|
| Foundry v10 to v13 | NodeJS 20 or 22 (24 will not work) |
| Foundry v14 | NodeJS 24 |
¶ Foundry Licensing and Multiple Instances
Please read and understand the terms of the Foundry license in regards to using it with multiple instances.
Basically, if you want to have more than one instance available to players at the same time you will need to have a separate Foundry license for that instance.
¶ Multiple Instance Installation
These instructions modify the ones in section C. Read through this whole section to understand what to do, and then you may want to refer back and forth and pay close attention to how you differentiate each instance in every command. Run through each step in section C as normal, except as noted below.
Each Foundry instance must have its own userdata location. Do not try to share the userdata location between multiple instances as you will encounter errors. The instructions below will create separate userdata folders, installation folders, and have each instance use its own port.
I1. Install Node Version Manager (NVM) and the required versions of NodeJS. Repeat the install command with the versions you wish to install.
curl -o- https://raw.githubusercontent.com/nvm-sh/nvm/v0.40.4/install.sh | bash
\. "$HOME/.nvm/nvm.sh"
nvm install 24
nvm install <version>
You can now use the nvm use <version> command immediately before launching Foundry to specify which version of NodeJS to use for that specific Foundry version.
I2. In steps C3 through C6, step C10, and step C17 nest the foundry and foundryuserdata folders one more level into a newly created folder reflecting the instance of Foundry. For example, your folder structure should look like:
Installation folder: /home/foundry/foundryv14/foundry
Userdata folder: /home/foundry/foundryv14/foundryuserdata
Note the foundryv14 here as an additional folder layer. Create as many of these additional folders as you'd like to have instances, for example foundryv11, foundryv13, foundrydev etc.
It can be helpful to be descriptive with the name of this folder to keep track of which instance resides in which folder. Use
foundryv12rather thanfoundry1,foundry2, etc.
Repeat the relevant steps for each instance.
I3. In steps C10, add a nvm use <version> && command and --port= argument after --dataPath= and before the closing ", and name each instance uniquely.
Every instance of Foundry should have its own unique port, unless you can guarantee that no two instances will ever be launched at the same time.
It can be useful to number the ports to reflect major versions of foundry, for example you'd use --port=30014 in the command for your Foundry v14 instance in step C10:
nvm use 24 && pm2 start "node $HOME/foundryv14/foundry/main.js --dataPath=$HOME/foundryv14/foundryuserdata --port=30014" --name foundryv14
NOTE: Different versions of Foundry have different locations of
main.js. Be sure you know where it is located for the version you are launching and adjust the above command accordingly.
Run this command for each instance, modifying the node version, paths, port, and name for each as you go.
In step C11 you would see each instance listed.
I4. Modify the Caddyfile in step C14 to reflect multiple instances.
You can only use domain names to refer to multiple instances here. When connecting to the bare IP without a port number, you must choose which single instance to connect to through the port number in the
reverse_proxydirective. If you want to connect to multiple instances without a domain name, you must specify the port when connecting to the bare IP.
When using subdomains, add additional blocks to the Caddyfile for each instance. For the bare IP, choose which instance to connect to by adjusting the port in the https:// { ... } block. For example:
# This replaces the existing content in /etc/caddy/Caddyfile

# A CONFIG SECTION FOR YOUR HOSTNAME

foundryv14.hostname.com {
    reverse_proxy localhost:30014
    encode zstd gzip
}

foundryv13.hostname.com {
    reverse_proxy localhost:30013
    encode zstd gzip
}

https:// {
    tls internal {
        on_demand
    }

    reverse_proxy localhost:30012
    encode zstd gzip
}

# Refer to the Caddy docs for more information:
# https://caddyserver.com/docs/caddyfile